
|
Copyright © 1999-2019 D. Guibouret

|
HOWTO
Table of contents
1- Preamble
2- Some definitions
3- Some DOS commands
a) Change drive
b) List directory contents
c) Change directory
d) Execute a program
4- Preparation
a) Boot disk creation (DOS version)
b) Boot disk creation (Windows version)
c) Temporary files removing
d) Defragmentation
e) Windows NT/2000/XP/... clone
f) Save-partition
g) Partition's name
h) Creating files on NTFS partition
i) What to save?
j) Boot computer
5- Saving
a) Start computer
b) Launch program
c) Action choice
d) Support choice
e) Partition choice
f) Content choice
g) Swap files directory
h) Save-partition mount
i) Automatic naming
j) First saving file name
k) Maximum saving file size
l) Compression ratio
m) Saving execution
n) Configuration file
6- Restoring
a) Action choice
b) Save-partition mount
c) First saving file name
d) Destination-partition choice
e) Confirmation
f) Restoring execution
g) End of restoring
7- After restoring
a) Source-partition saved on itself
b) Windows 2000, XP, ...
c) Windows multiboot
d) Linux
e) Partition no more booting
8- Another way to find partitions
This is not the Partition-Saving manual. This is a short description of how to use this program in a standard case. For more details, please read the manual and the FAQ.
A drive is a partition on a hard disk, a floppy drive or any other device that allows the storing of data. With DOS it is identified with a letter between 'A' and 'Z' followed with a ':' ('[', '\', ']', '^' and '`' are accepted as drive letter but they are rarely used).
A directory (or folder) is an element of a drive that allows grouping files (or other directories) together. Directories are organized on a drive in a "tree". A directory inside another directory is called a "sub-folder". A directory that contains a sub-folder is called the "parent directory" or "upper directory" of the sub-folder. The uppermost directory on a drive (corresponding to the base of the tree) is called the "root" directory.
The partition containing the data you wish to save is the "source-partition". The partition to which you save the files containing this data is the "save-partition". The partition to which you wish to ultimately restore the data is the "destination-partition".
DOS is an operating system (OS) that runs via a command line. Below are some useful DOS commands. All of these commands must be completed with an Enter key to be executed.
| 3.a | Change drive
To change from a drive to another, you have to enter "<drive letter>:". Example:
|
| 3.b | List directory contents
To list what a directory contains, you have to enter "dir". If you enter "dir <directory name>" you will get contents of <directory name>. If you do not give a directory name, you will get contents of current directory. If there were more files into a directory than can be shown on screen, you can enter "dir <directory name> /p" to pause the listing between each screen. Example:
|
| 3.c | Change directory
To change from one directory to another, you have to enter "cd <directory name>". If you do not give a <directory name>, the current directory name will be displayed. If <directory name> is equal to ".", nothing is done. If it is equal to "..", you are moved to the next directory upward in the tree. If it is equal to "\", you go to the root directory in the tree. You can cross over several directories by separating them with a "\". Example:
|
| 3.d | Execute a program
To execute a program, you enter its name. DOS begin to search for a file "<program name>.bat", "<program name>.com" or "<program name>.exe" in the current directory, then into all directories listed in the "PATH" variable (which value can be displayed by entering "path"). You can also give a directory name with a program name for DOS to search it directly in that specific directory. Example:
|
Here are the steps in preparing to save/restore a partition:
| 4.a | Boot disk creation (DOS version)
To save/restore a partition, you need a boot floppy disk or CDROM or DOS 3.3 or later or Windows 3.x, 9x, Me installed on your hard disk. To learn how to create a boot floppy, read FAQ Q10 or search for "boot disk" in Windows help. Make sure that fdisk.exe, sys.com and format.com are on the boot floppy; they can be useful. Copy savepart.exe on it (or onto another floppy disk if there is not enough room). This is not needed if savepart is already on a FAT partition, but you must do it if savepart is on a NTFS partition otherwise DOS will not be able to access it. |
| 4.b | Boot disk creation (Windows version)
Saving system partition from Windows is not available because program cannot disallow other programs to access it when saving it (and no doing this will result into a wrong backup). So you shall have either another Windows installation, or create a WinPE or BartPE CD. You can also use the Windows Vista/Seven recovery console (not the Windows XP one because it has reduced functions). You can also read chapter 27 of manual to get more details on this version. |
| 4.c | Temporary files removing
To avoid saving useless data, remove temporary or uneeded files. The Windows swap file can also be moved onto another partition to avoid saving it (from V3.00 version, there is an option to not save it). |
| 4.d | Defragmentation
It is good to defragment partition before saving it. This will group all data at the beginning of the partition, which will allow you to restore it on a smaller partition, if you wish. In other cases it is not needed. |
| 4.e | Windows NT/2000/... clone
If you wish to clone a Windows NT/2000/XP/Vista/Seven partition on another computer, you have to prepare Windows to this. For this purpose, please read Microsoft site and search for sysprep tool. Please note that this is better to do a fresh install in case both computers do not have the same hardware. |
| 4.f | Save-partition
You need a FAT, NTFS or ext2 partition or a device that is DOS-writeable to create saving files. In most cases, writing directly to a CD under DOS is not possible. So, you nearly always need to create a saved file on the hard disk, then return to your usual OS to burn the CD in a separate operation. For USB devices, some generic DOS drivers exist. If you have several types of partition (like NTFS and FAT) in a logical partition, you have to locate the FAT save-partition before the others (so that DOS will be able to find it). |
| 4.g | Partition's name
To be able to keep track of the partitions, it is best to give each a name. This will avoid confusion in case the matchup between a partition and a corresponding letter is wrong. For this:
|
| 4.h | Creating files on NTFS partition
This step is not needed if you can save files to a FAT or ext2 partition or if you use Windows version without trying to save a NTFS partition on itself. If you have only NTFS partitions available as save-partitions, you have to first use Windows to create some files (program needs to have these entries in a directory; it is not able to create them from DOS):
|
| 4.i | What to save?
The most important partition to save is the one where the OS is. If the OS is installed on one partition and programs on another, there may be links between them (for example the registry and Windows DLL); in this case, save both partitions by running savepart twice. A better way, perhaps, is to create at least 2 partitions: one with the OS and programs, the second with your data. This way, the data will not be erased in case of a problem with the OS only. Otherwise, if everything is on the same partition, you may have to first save your data elsewhere to avoid its replacement by older version when the partition is restored. Saving the partition table or MBR is a good idea in case one day a virus infects your computer (some of them destroy this data). With Windows Vista and Seven, Windows can create a small partition before its main partition. This partition contains the boot information, so it can be a good idea to save it. |
| 4.j | Boot computer
When exiting your OS to boot the computer to launch Partition-Saving, do not put this OS into hibernation mode (be aware that it is Windows Vista default mode, in start menu, choose the reboot through the arrow button listing all shutdown modes). This can lead to wrong result as OS does not allow or can be corrupted in case of filesystem modification when being into this mode. For the same reason, shutdown it or boot it cleanly. If you push the reset button from Windows, you will have a damaged filesystem (this can also happen when booting with Alt+Ctrl+Del). |
Here are steps involved in saving a partition:
| 5.a | Start computer
Boot to DOS (or Windows depending on version) with your boot floppy disk or CDROM. |
| 5.b | Launch program
Launch "savepart.exe" at prompt (change floppy disk before if it is on another one, or go to directory where it is in case it is on disk). |
| 5.c | Action choice
Choose "Save an element" in the first window.  |
| 5.d | Support choice
Choose a support option. 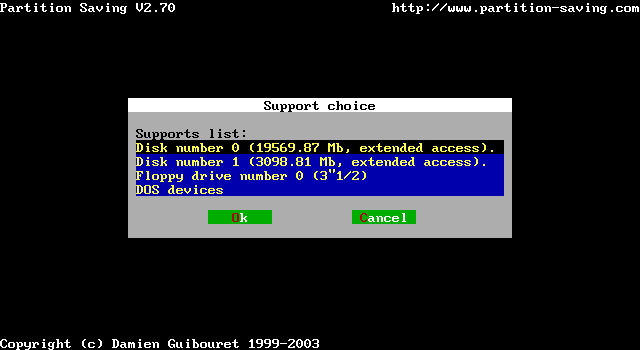 |
| 5.e | Partition choice
Choose the partition you want to save (use the name you gave it earlier; do not rely on drive letters, since these can be misassigned and DOS does not see NTFS partitions at all) (the one named WINDOWS in this example).  If no partition appears, this can mean partitions table is wrong. You can use partinfo tool to check it. If problem is due to a difference in disk size depending on used OS, you can use the "-tds" option ("savepart -tds") or use a Partition-Saving version that runs on the OS used to create these partitions (this second option being better). |
| 5.f | Content choice
Choose what you want to save. To have smallest file size, choose "occupied sectors without swap files". If you have only one partition (so that the saving file will be on the source-partition), you must choose "element on itself" or "element on itself without swap files" option. If you choose first option (all sectors) or if this window does not appear, it means you will be able to restore only to a partition of the exact same size, at the same place on a disk having the same format. Choosing one of the 4 last options allows you to restore partition on a partition with a different configuration. 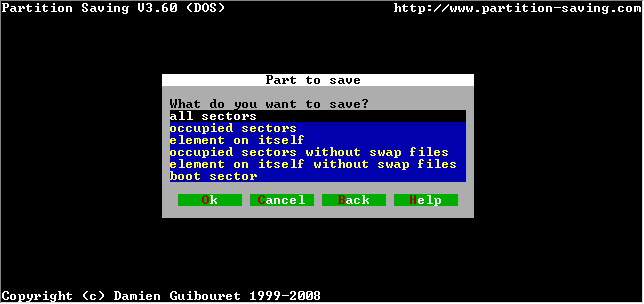 |
| 5.g | Swap files directory
If you choose one of the "without swap files" options, you have to give the directory name where the swap files are located. Program always searches for them in the root directory and then in the directory you specify here. In most cases, swap files are in the root directory or the Windows directory; Windows directory is a good choice here (WINDOWS in this example but depending on Windows version, or if you gave another name at installation, it can have another name). 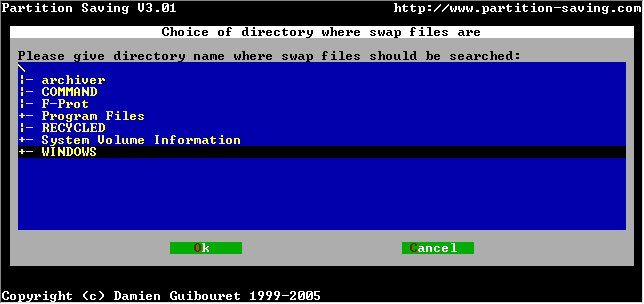 |
| 5.h | Save-partition mount
If you have to use an NTFS (for DOS version) or ext2 (for DOS and Windows versions) partition as save-partition, you have to first mount it. To do this:
|
| 5.i | Automatic naming
Select "Automatic naming" in case you want to use it. Program will automatically change file extension in case several files are needed; a second file will have an extension ending with 01, third with 02, etc. If you do not have a mouse, press "Alt+Tab" to activate the window where this option is, the spacebar activates the checkbox. |
| 5.j | First saving file name
Enter the filename you want to use as first saving file (full pathname or go to the directory by using "Drives" and "Directories") (0:\IMAGE.PAR in this example). 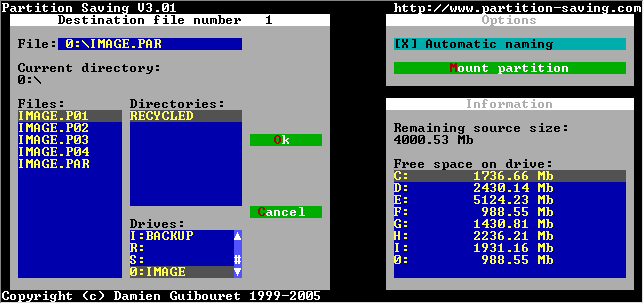 Unless you choose an option to save partition on itself, you should not choose the drive corresponding to the source-partition. With DOS:
If you get an error telling you the file cannot be created or written:
|
| 5.k | Maximum saving file size
Enter the maximum size you want the file to be. If more space is needed, several files are created (680 in this example to burn files on 700 MB CD).  |
| 5.l | Compression ratio
Select the compression ratio: use a low value in case your computer is not powerful (2 is a good value). Otherwise, use something higher. Values above 5 give very little gain in comparison with time spent.  |
| 5.m | Saving execution
At this point, saving begins.  |
| 5.n | Configuration file
Program asks you if you want to create a configuration file that will allow you to save/restore this partition automatically the next time.  |
Saving is complete. You can now boot back to Windows if you want to burn
created file onto a CD.
For best results, do not burn them at a too high speed because
you can have problem in case they are not well burned. It is always
a good idea to check if burned CDs are correct. Boot back into DOS and
use the "Check a saving file" option.
If you created the configuration file, you may need to modify it with a
text editor to update the file pathname ("file=" lines), since moving files
changes their pathname.
If when saving you have created the configuration file and you want to
restore the source-partition, enter "savepart -r -f <configuration
filename>" and restoring will be automatic.
Warning: no confirmation will be asked for.
If you did not create a configuration file or prefer to restore by hand, the steps are below:
| 6.a | Action choice
Choose "Restore an element" option in first window.  |
| 6.b | Save-partition mount
In case saving files are on a NTFS or ext2 partition you must first mount it (as you did when saving; see 5.h above). |
| 6.c | First saving file name
You have to enter the name of first saving file: you should enter its full pathname into "File" line (or double-click on its name into the "Files" list after moving to its directory with "Drives" and "Directories" lists). You must be sure that this file is not on the destination-partition. As for saving, you can choose the automatic naming option for following files name to be automatically deduced.  |
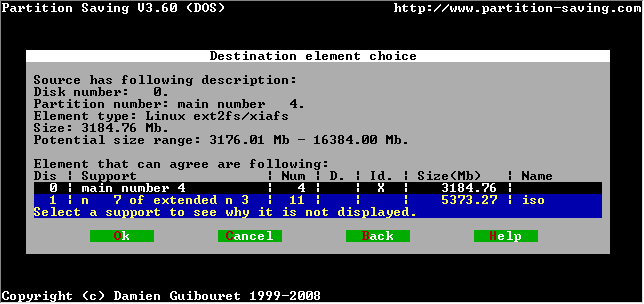
| 6.d | Destination-partition choice
Depending on this first file contents and how your partitions are set up, program offers you a list of destination-partitions how which restoring can be done. The one that is identical to the source-partition is marked with an 'X' into "Id." column. Notes:
 |
| 6.e | Confirmation
You have to confirm your choice. 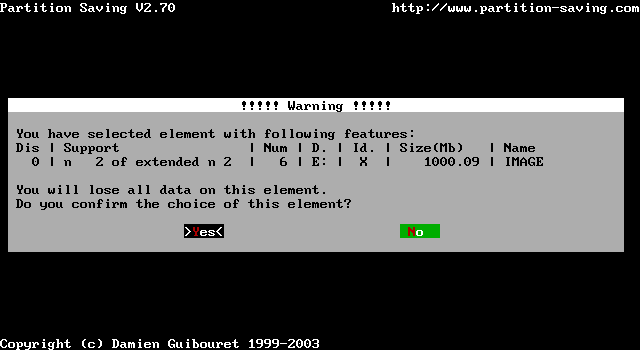 |
| 6.f | Restoring execution
Restoring begins. If saving involved several files and you did not choose automatic naming, program will ask for the name of the next file when it reaches end of current one. Do not rely on the estimated time if you saved occupied sectors only because it is computed as if all sectors are occupied. If you used compression, the restore operation should go faster than saving; else it takes nearly the same time.  |
| 6.g | End of restoring
Once restoring is ended, you should not access to restored partition before having booted your computer. This is because information that DOS has into memory are no more coherent with partition content and so using it will end with data corruption. Note: some people have to power off there computer to be sure that memory is cleared, but this is an extrem case. |
Once restoring is ended, you can have to perform some operations after first reboot. Usually this is in case the destination-partition is different from the source one. Mostly encountered operations are:
| 7.a | Source-partition saved on itself
If you saved partition on itself (source-partition and save-partition are the same), saving files can appear on destination-partition. In this case you can remove them as they are no longer needed(I speak about the files that can appear on destination-partition, not those you used to do these restoring which are always correct). It is better to perform a check of the destination-partition if it is not automatically done. |
| 7.b | Windows 2000, XP, ...
If you choose a destination-partition that is different from the source one (either it is not on the same disk or beginning of partition has moved on disk) and you have Windows 2000, XP, Vista or Seven, you have to update some definitions into registry (see chapter 11 of manual). As a summary, if your source-partition was your system partition, you have to choose to update registry, choose the destination-partition as Windows partition, then as partition to change drive assignment and set it the drive letter of the source-partition. If the destination-partition was present when you perform the save and the source-partition is still here, you will have to assign the previous drive letter of the destination-partition to the source one (still for the Windows on the destination-partition). |
| 7.c | Windows multiboot
If you have several Windows installation, you use Windows multiboot feature and your source-partition was your boot or system partition, you have to update some files on the destination-partition (if it is not the same as source-partition):
|
| 7.d | Linux
If the source-partition was used with Linux, and destination-partition is different from source one, you have to update the "/etc/fstab" (file that describes mount points). If it a system partition, you will have also to update the boot loader. For this you have to boot with the Linux CD and use the rescue mode to update mount point and boot loader (in most cases, rescue mode allows such operations, but it depends on distribution). |
| 7.e | Partition no more booting
In some cases, if you restore a system partition, it could be made non-bootable. You have to:
|
8- Another way to find partitions
Starting from version 3.80, there is another way for program to know which
partition shall be saved/restored and where. You can create a file
to mark partition to save/restore and another one to mark partition where to
put/get backup files. Then when you launch program, you can tell him to search
for these files through the "-fp" and "-ff" options.
This allows replacing steps 5.d,
5.e, 5.f,
5.g, 5.h,
5.i, 5.j,
5.k, 5.l when saving,
and steps 6.b, 6.c,
6.d, 6.e when
restoring. Be aware that program will ask for confirmation that found
partitions are searched ones, but it will not ask for confirmation to overwrite
destination.
If you create the marker files through the dedicated option ("Creating
files marking drives to use"), this can replace the preparation step
4.h.
To get more details on how to use this, you can look at
chapter 22 of manual.